Android Application Basics
Introduction
Hi Everyone !!!This is first Blog for Android Application Basics course. This is for someone who want to start his career in Android Application or want to add Android Application skill to his portfolio.By the end of this course you will have a fair understanding of how android works and also we will be developing a test app in this course which will give you hands on experience on Android Development. In this chapter will be covering setting up android studio and creating a test app
Downloading and Installing Android Studio
First Step is installing Android Studio in your system. Please use this link to install latest version of Android Studio in your system.
Creating your First Project
When you will start the android studio from the popup select Create new Project. From the Choose your Project screen select Basic Activity and click Next. Give any name for your application for our use we will give it name myTestApp. Minimum API level dropdown is something you need to pay attention. As we know google releases new versions of Android frequently with new enhanced features. Here we select which minimum version of API we want our app to support. For every version it will show you an approx percentage of devices these app will work on. You can also click on Help me choose button to see what features are supported in API level and how much devices it targets. For this tutorial I will choose API 24: Android 7.0(Nougat). After clicking Finish android studio will bootstrap basic android app for you.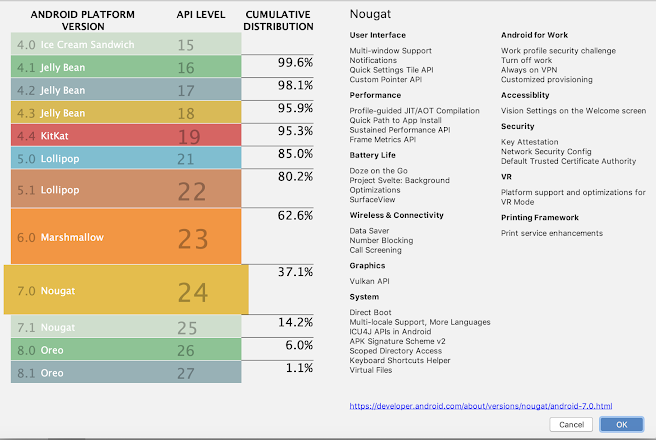
Review The App Layout in Android Studio
The layout in android studio is made very self explanatory. Let's look some of the key elements of this layout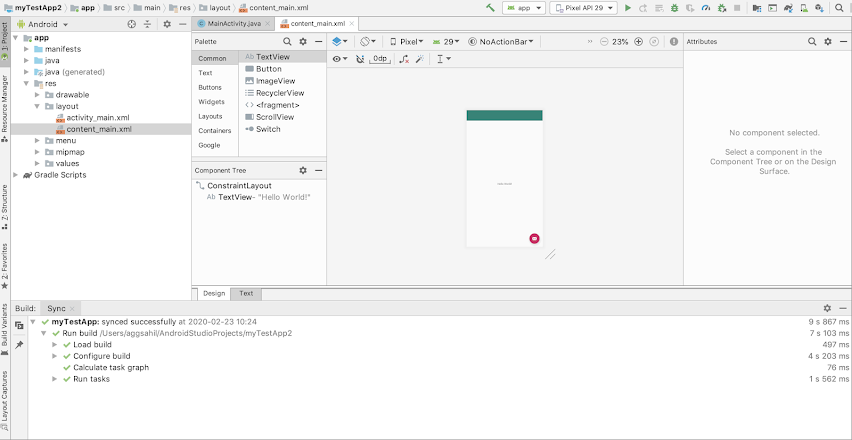
Project View: This show the layout of folders in your android project. By Default Android View selected which is android development friendly as list all the important resources for android like the Menifest, java, resources.
Palette: This indicates a list of different what we call widgets or views, or sometimes we even say controls, that we can use in our user interface.
Component Tree: Component Tree gives us a tree-like representation of how the views are arranged on our layout.
Design View: Shows Screen preview as the screen will be visible to user.
Note: Below component tree box there are two tabs(with Design Tab selected). If you click on Text tab it will show you an xml file. This xml file is text layout of your design which is used by android studio to laid down the design.
Modify Our App Layout
If we select "Hello World" text view showing on the screen in our design view, It will show attributes associated with the view. The Id attribute let us define the ID of our view, which we will use in our Java codeto reference to our view. The other two attribute to look are layout_width and layout_height. Currently there value is wrap_content, which means it will increase or decrease based on the content need in it. We will set our layout_width to match_constraint. I will explain later in the couse why i did so. For now just know that match_constraint says size the view based on constraint info provided. When you will do so it will change the value to 0dp. This is how this is internally treated.

Adding Some Java Code
Now Let's look at our Java code to see what is happening. Open the filecom.example.mytestapp.MainActivity in our java folder. There will be a function onCreate
x
protected void onCreate(Bundle savedInstanceState) {
super.onCreate(savedInstanceState);
setContentView(R.layout.activity_main);
Toolbar toolbar = findViewById(R.id.toolbar);
setSupportActionBar(toolbar);
FloatingActionButton fab = findViewById(R.id.fab);
fab.setOnClickListener(new View.OnClickListener() {
public void onClick(View view) {
Snackbar.make(view, "Replace with your own action", Snackbar.LENGTH_LONG)
.setAction("Action", null).show();
}
});
}
This is the part of our application responsible for tying togather the UI layout and our application behaviour. Interesting thing to note here is that it calls
setContentView(R.layout.activity_main); where it loads the UI for this activity. This is the same layout file which we have seen previously. Another
thing is that it also provides an example of how we access various layout views here and bind different actions with them. On line 5 of our function we referenced our view using provieded
findViewById function and then set an setOnClickListener on it. For this part we will not change anything in this but in upcoming we will be adding new features to this.Testing Our App In Android Emulator
Emulator are software representation of an Android device. We can both run our code on Actual device or an Emulator. For this course we will be using Emulator. To Launch our emulator click on Debug icon on thetop toolbar.
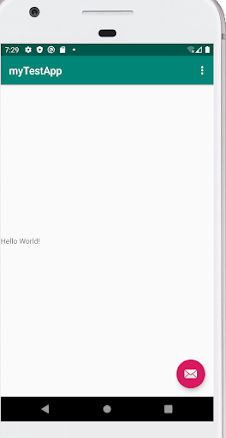
It will show us Deployment Target. If any physical android device is plugged into my system it will show here or I can click Create New Virtual Device to create an virtual device. Then select any device. I have selected Pixel 2. On next screen download an system image for your device and then click next and finish. Once click it will show our virtual device in the list of devices. Select and it will run our app on the emulator.
Comments
Post a Comment